


JSX 支持
VRender 支持 JSX 形式的创建场景树,如果您需要使用这种模式,请按以下步骤检查环境:
环境配置
如果您是在 react 项目中使用 jsx 语法来描述场景树节点,那么您需要给 VRender 的 jsx 外层包裹一个转换函数,以便于将 react 的虚拟节点转换成 VRender 的场景树节点
const group = decodeReactDom(
  <VGroup attribute={{ x: 100, y: 100 }}>
    <VRect attribute={{ x: 10, y: 10 }} />
  </VGroup>
);
如果您的项目不是 react 项目,那么需要配置 babel 的 jsx 解析以便于支持 jsx 语法:
plugins: [
    react({
      babel: {
        parserOpts: {
          plugins: ['decorators-legacy', 'classProperties']
        },
        plugins: [
          [
            '@babel/plugin-transform-react-jsx',
            {
              pragma: 'jsx',
              pragmaFrag: 'Fragment'
            }
          ]
        ]
      }
    })
],
然后在代码中 import jsx 即可
import { jsx, VGroup, VRect } from '@visactor/vrender';

const group = (
  <VGroup attribute={{ x: 100, y: 100 }}>
    <VRect attribute={{ x: 10, y: 10 }} />
  </VGroup>
);
API 支持
使用 jsx 语法的图元都以V开头,接受一个 attribute 属性,这个 attribute 属性的参数具体参考配置文档,支持 name、id、states 配置,最终都会被设置到图元上
事件命名有所不同,事件的 Map 如下所示:
{
  onPointerDown: 'pointerdown',
  onPointerUp: 'pointerup',
  onPointerUpOutside: 'pointerupoutside',
  onPointerTap: 'pointertap',
  onPointerOver: 'pointerover',
  onPointerMove: 'pointermove',
  onPointerEnter: 'pointerenter',
  onPointerLeave: 'pointerleave',
  onPointerOut: 'pointerout',
  onMouseDown: 'mousedown',
  onMouseUp: 'mouseup',
  onMouseUpOutside: 'mouseupoutside',
  onMouseMove: 'mousemove',
  onMouseOver: 'mouseover',
  onMouseOut: 'mouseout',
  onMouseEnter: 'mouseenter',
  onMouseLeave: 'mouseleave',
  onPinch: 'pinch',
  onPinchStart: 'pinchstart',
  onPinchEnd: 'pinchend',
  onPan: 'pan',
  onPanStart: 'panstart',
  onPanEnd: 'panend',
  onDrag: 'drag',
  onDragStart: 'dragstart',
  onDragEnter: 'dragenter',
  onDragLeave: 'dragleave',
  onDragOver: 'dragover',
  onDragEnd: 'dragend',
  onRightDown: 'rightdown',
  onRightUp: 'rightup',
  onRightUpOutside: 'rightupoutside',
  onTouchStart: 'touchstart',
  onTouchEnd: 'touchend',
  onTouchEndOutside: 'touchendoutside',
  onTouchMove: 'touchmove',
  onTouchCancel: 'touchcancel',
  onPress: 'press',
  onPressUp: 'pressup',
  onPressEnd: 'pressend',
  onSwipe: 'swipe',
  onDrop: 'drop',
  onWeel: 'wheel',
  onClick: 'click',
  onDblClick: 'dblclick'
}
Demo
我们可以通过如下所示的jsx配置支持一个 flex 布局效果
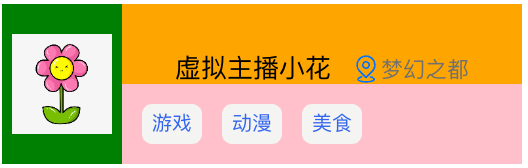
import { decodeReactDom, VGroup, VImage, VText, VTag } from '@visactor/vrender';
decodeReactDom(
  <VGroup attribute={{ x: 100, y: 100, width: 260, height: 80, background: '#cecece', display: 'flex' }}>
    <VGroup
      attribute={{
        display: 'flex',
        background: 'green',
        width: 60,
        height: 80,
        direction: 'column',
        alignItems: 'center',
        justifyContent: 'space-around'
      }}
    >
      <VImage
        attribute={{
          image: 'https://lf9-dp-fe-cms-tos.byteorg.com/obj/bit-cloud/VTable/custom-render/flower.jpg',
          width: 50,
          height: 50
        }}
      ></VImage>
    </VGroup>
    <VGroup
      attribute={{
        display: 'flex',
        background: 'red',
        width: 200,
        height: 80,
        direction: 'column'
      }}
    >
      <VGroup
        attribute={{
          display: 'flex',
          background: 'orange',
          width: 200,
          height: 40,
          direction: 'column',
          alignItems: 'flex-end',
          justifyContent: 'center'
        }}
      >
        <VText attribute={{ text: '虚拟主播小花', fontSize: 13, fontFamily: 'sans-serif', fill: 'black' }}></VText>
        <VImage
          attribute={{
            name: 'aaa',
            image: 'https://lf9-dp-fe-cms-tos.byteorg.com/obj/bit-cloud/VTable/location.svg',
            width: 15,
            height: 15,
            boundsPadding: [0, 0, 0, 10]
          }}
        ></VImage>
        <VText attribute={{ text: '梦幻之都', fontSize: 11, fontFamily: 'sans-serif', fill: '#6f7070' }}></VText>
      </VGroup>
      <VGroup
        attribute={{
          display: 'flex',
          background: 'pink',
          width: 200,
          height: 40,
          direction: 'column',
          alignItems: 'center'
        }}
      >
        <VTag
          attribute={{
            visible: true,
            textStyle: {
              fontSize: 10,
              fill: 'rgb(51, 101, 238)',
              textAlign: 'left',
              textBaseline: 'top',
              fontFamily: 'sans-serif'
            },
            space: 4,
            padding: 5,
            shape: {
              fill: '#000'
            },
            text: '游戏',
            panel: {
              visible: true,
              fill: '#f4f4f2',
              cornerRadius: 5
            },
            marginLeft: 10,
            boundsPadding: [0, 0, 0, 10],
            x: 20,
            y: 10
          }}
        ></VTag>
        <VTag
          attribute={{
            visible: true,
            textStyle: {
              fontSize: 10,
              fill: 'rgb(51, 101, 238)',
              textAlign: 'left',
              textBaseline: 'top',
              fontFamily: 'sans-serif'
            },
            space: 4,
            padding: 5,
            shape: {
              fill: '#000'
            },
            text: '动漫',
            panel: {
              visible: true,
              fill: '#f4f4f2',
              cornerRadius: 5
            },
            marginLeft: 10,
            boundsPadding: [0, 0, 0, 10],
            x: 60,
            y: 10
          }}
        ></VTag>
        <VTag
          attribute={{
            visible: true,
            textStyle: {
              fontSize: 10,
              fill: 'rgb(51, 101, 238)',
              textAlign: 'left',
              textBaseline: 'top',
              fontFamily: 'sans-serif'
            },
            space: 4,
            padding: 5,
            shape: {
              fill: '#000'
            },
            text: '美食',
            panel: {
              visible: true,
              fill: '#f4f4f2',
              cornerRadius: 5
            },
            marginLeft: 10,
            boundsPadding: [0, 0, 0, 10],
            x: 100,
            y: 10
          }}
        ></VTag>
      </VGroup>
    </VGroup>
  </VGroup>
);
推荐用法
如果希望给一个图元添加子图元,除了可以给 group 添加节点外,还可以使用 shadowGraphic 配合 JSX,非常适合在 VChart 环境中使用
const text = createText({
  x: 200,
  y: 300,
  text: '这是一段文字',
  fill: 'red',
  shadowGraphic: decodeReactDom(
    <VGroup>
      <VSymbol attribute={{ symbolType: 'star', x: 100, y: 100, fill: 'green' }}></VSymbol>
    </VGroup>
  )
});