


自定义 Character
在前面的章节中,我们介绍了 DSL 的基本概念,然后介绍了如何使用 VStory 来编排一个故事。但是在实际的开发中,我们可能需要自定义一些 Character,比如自定义一个特殊的组件,然后在 DSL 中使用。这个章节我们以一个真实的例子,介绍如何自定义一个 Character。
介绍
我们提供了@visactor/vstory-external包,用于方便用户进行自定义 Character 的开发。一些扩展功能都可以在这个包中实现。下面我们通过一个接入 Lottie 的例子来介绍如何在这个包中进行扩展。
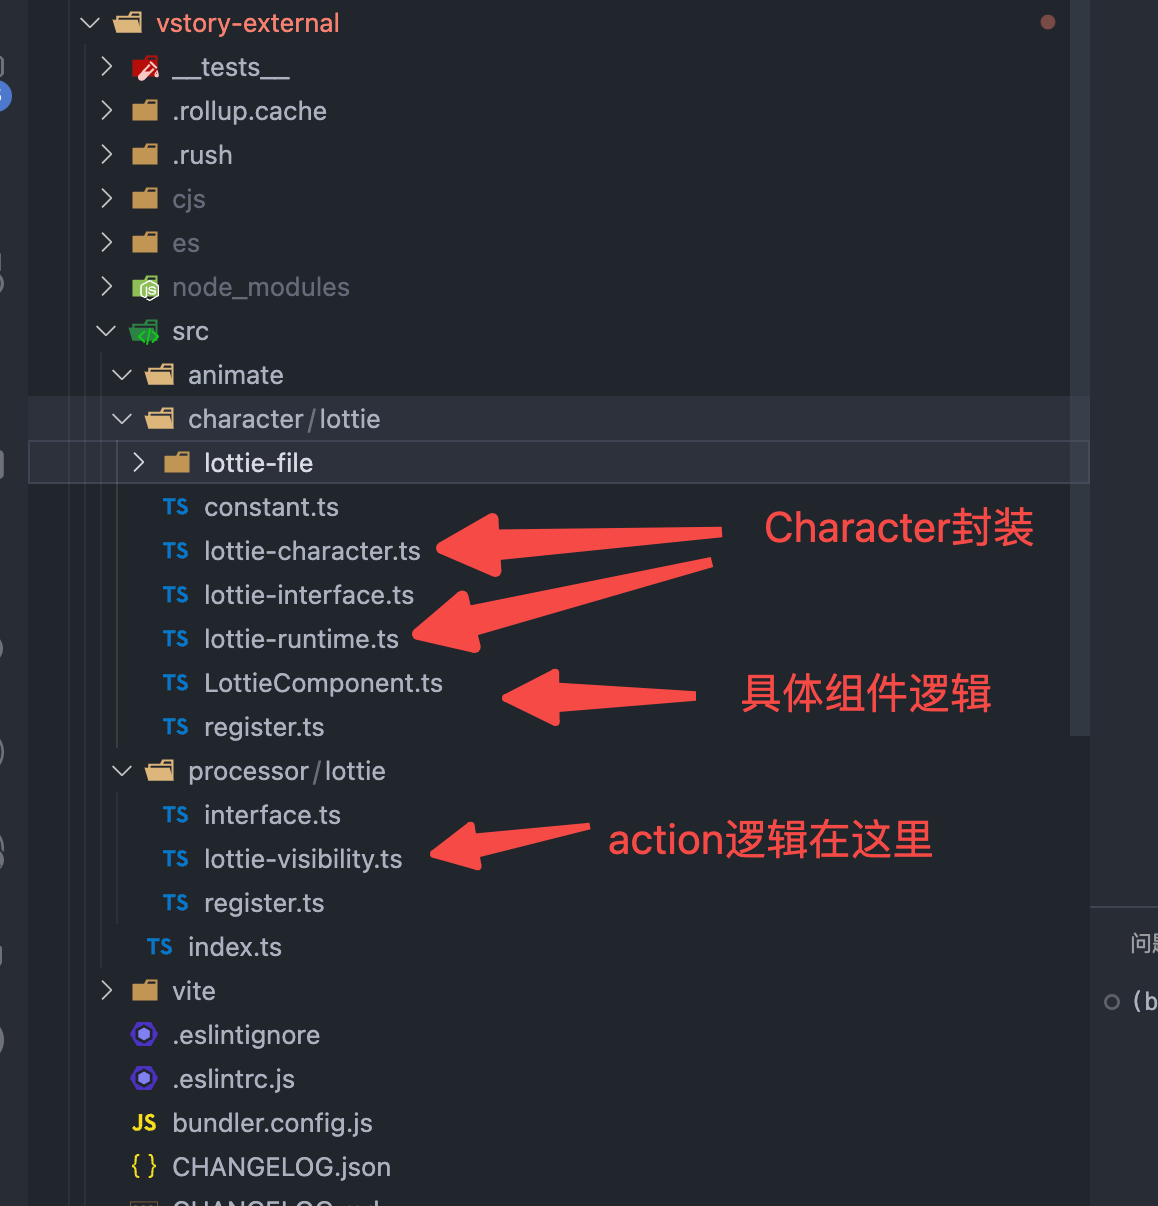
自定义一个 Lottie 的 Character
如果需要在作品中现在需要展示一个 Lottie 动画,但是 VStory 的主包里并没有提供这样的 Character。现在我们就需要在@visactor/vstory-external包中进行扩展。
实现一个基于 VRender 的组件
VStory 底层是基于 VRender 的,所以我们需要用 VRender 先实现对应的功能,然后再接入到 VStory 中成为 VStory 的一个Character。很好的是@visactor/vrender-kits里已经提供了一个 Lottie 图元,我们可以直接使用。
我们找到了@visactor/vrender-kits包中的Lottie图元,在 VStory 中使用它我们需要将它封装一下,封装的目的有两个:
- 提供一些默认的属性
- 提供参数转换,因为 VStory 中的参数和 VRender 中
Lottie图元的参数是不一样的,所以我们需要进行参数转换。比如布局的参数要转成对应的 x、y、width、height 等参数。 - 得到一些 VStory 的特殊能力,比如 VStory 的所有组件都携带一个文字配置。
export class LottieComponent extends BaseComponentWithText {
  static defaultAttributes: Partial<ILottieComponentAttributes> = {
    visible: true,
    textStyle: {},
    width: 100,
    height: 100,
    padding: {
      top: 0,
      bottom: 0,
      left: 0,
      right: 0
    }
  };

  lottieInstance: Lottie;

  constructor(attributes: ILottieComponentAttributes, options?: ComponentOptions) {
    super(options?.skipDefault ? attributes : merge({}, LottieComponent.defaultAttributes, attributes));
  }

  protected render(): void {
    super.render();
    // 添加image
    this.renderLottie();
  }
  protected renderLottie() {
    const { graphic, padding, width, height } = this.attribute as ILottieComponentAttributes;
    const attrs = { ...graphic };
    if (!attrs.x) {
      attrs.x = padding.left;
    }
    if (!attrs.y) {
      attrs.y = padding.top;
    }
    if (!attrs.width) {
      attrs.width = width - padding.left - padding.right;
    }
    if (!attrs.height) {
      attrs.height = height - padding.top - padding.bottom;
    }
    if (!this.lottieInstance) {
      const lottie = new Lottie({});
      this.lottieInstance = lottie;
      this.addChild(lottie);
    }
    this.lottieInstance.setAttributes({ ...attrs, scaleX: 1, scaleY: 1, angle: 0, postMatrix: null });
  }
}
封装一个 Character
有了一个Lottie组件之后,我们就可以封装一个Character了。后续再DSL中的character配置就会被实例化为我们现在封装的Character实例,在 Character 中,我们将会使用上面的Lottie组件。
export class LottieCharacter extends CharacterComponent<LottieComponent, ILottieComponentAttributes> {
  static type = LOTTIE;

  protected _group: IGroup;

  protected createAndAddGraphic(attribute: ILottieComponentAttributes): void {
    this._graphic = new LottieComponent(attribute);
    this.canvas.addGraphic(this._graphic);
  }

  protected _initRuntime(): void {
    super._initRuntime();
    this._runtime.push(LottieRuntimeInstance);
  }

  protected getDefaultAttribute(): Partial<ILottieComponentAttributes> {
    return {
      ...super.getDefaultAttribute(),
      width: 100,
      height: 100
    };
  }

  protected _clearGraphic(): void {
    super._clearGraphic();
  }

  show() {
    this._graphic.setAttribute('visibleAll', true);
  }
  hide() {
    this._graphic.setAttribute('visibleAll', false);
  }
}
实例封装好了之后,我们需要定义一下Lottie的Runtime。Runtime是一个Character的运行时执行的内容,其有一些生命周期,比如当主动更新 Character 的 options 时,runtime 就会执行
export class LottieRuntime implements IComponentCharacterRuntime {
  type = 'Lottie';
  applyConfigToAttribute(character: ICharacterComponent): void {
    const rawAttribute = character.getAttribute();

    const { data } = rawAttribute.graphic;
    // 放一个默认的lottie
    const builtData = builtinLottieMap[data];
    if (builtData) {
      rawAttribute.graphic.data = builtData;
    }
    // TODO 目前VRender有问题,必须配置fill才能绘制
    rawAttribute.graphic.fill = true;
  }
}

export const LottieRuntimeInstance = new LottieRuntime();
定义 processor
上面我们定义好了一个 Lottie 的 Character,现在我们需要定义具体的行为了,比如 appear、disappear、style 等用来执行入场、出场、样式变化的行为。代码中行为的定义在processor中。processor 负责处理 DSL 中定义的对应行为。我们只需要给Lottie定义一个 appear 和 disappear 的 processor 即可。其他的就复用通用组件的行为
我们要做的很简单,只需要在 appear 的时候,调用图元播放 Lottie 动画就行。其他的就复用通用组件的行为
function runLottieAnimate(character: ICharacter, effect: string) {
  const graphics = getCharacterByEffect(character, effect) as IGraphic[];
  graphics.forEach((graphic: any) => _runLottieAnimate(graphic));
}

function _runLottieAnimate(graphic: IGraphic) {
  if (graphic && graphic.type !== 'text' && graphic.type !== 'richtext') {
    // appear的时候,播放Lottie动画
    if (graphic.lottieInstance) {
      graphic.lottieInstance.stop();
      graphic.lottieInstance.play();
    }
  }
}

export class LottieVisibilityActionProcessor extends CommonVisibilityActionProcessor {
  name: string = 'appearOrDisAppear';
  constructor() {
    super();
  }

  run(character: ICharacter, actionSpec: IActionSpec): void {
    super.run(character, actionSpec);
    // 执行lottie的特殊行为
    runLottieAnimate(character, actionSpec.action);
  }
}
注册
接下来我们导出Character和Processor的注册方法即可。
具体的代码大家在packages/vstory-external/src/character/lottie和packages/vstory-external/src/processor/lottie中可以看到。
最终,我们就可以在DSL中使用Lottie了。